Aircraft braking systems are essential for ensuring safe ground operations, and like all critical components, airplane brake pads require regular inspection, maintenance, and timely replacement. The replacement process varies significantly depending on the type of aircraft, ranging from simple general aviation planes to large commercial jets. Each variation demands different levels of expertise, tools, and procedures.
Understanding Aircraft Brake Systems
The braking system in an airplane is engineered to handle unique aerodynamic and structural challenges. Unlike cars that rely on brakes constantly during urban or highway driving, aircraft use brakes primarily during landing and ground maneuvering. Therefore, while they may not be in frequent use, they must perform flawlessly under extreme pressure and heat.
Most light aircraft feature single-disk brake systems, similar in principle to those found in automobiles. However, jets and commercial airliners typically use multi-disk brake assemblies integrated within the wheel hubs. These systems are far more complex, requiring removal of the wheel and detailed disassembly for brake pad access.
Pre-Replacement Inspection and Safety Protocols
Before initiating any brake maintenance, a thorough inspection is mandatory. This involves checking pad wear, hydraulic lines, brake fluid condition, and rotor integrity. Aircraft maintenance manuals provide Minimum Service Limits for pad thickness. Operating beyond these thresholds compromises braking effectiveness.
Safety is paramount. The aircraft must be properly chocked, power off, and jacked if necessary to provide clearance for work. Grounding cables are attached to prevent static discharge. Technicians wear appropriate Personal Protective Equipment (PPE), including gloves and safety glasses, especially when working around hydraulic fluids or metal filings.
Replacing Brake Pads on Light Aircraft
In typical single-disk setups—found in aircraft like the Cessna 172 or Piper Cherokee—the process is straightforward. The brake caliper, often mounted to the gear leg, is held together by two bolts. These are usually secured with safety wire, a redundancy feature preventing loosening during flight.
The technician proceeds as follows:
- Clip and remove the safety wire.
- Unscrew the two main bolts to release the caliper.
- Slide the caliper off the brake disk.
- Remove the old brake pad holders from each side of the disk.
- Drill out the rivet heads securing the old pads.
- Install new pads and re-rivet them to their respective holders.
- Reinstall the pad assemblies into the caliper.
- Slide the caliper back into position, reinsert and torque the bolts.
- Apply new safety wire to secure the bolts.
This job typically takes less than an hour, excluding prep and wheel fairing removal, which can sometimes be more time-consuming than the brake pad job itself.
Servicing Drum Brakes on Older Aircraft
Some vintage models or utility planes such as the Aeronca Champ still use drum brake systems. These are conceptually similar to those found on early automobiles. In this case, the brake shoes press outward against a drum inside the wheel. To access and replace the pads (also called shoes):
- The wheel must be removed entirely.
- The brake drum is pulled away to expose the brake shoes.
- Return springs and hardware are disconnected.
- The worn shoes are removed and replaced.
- Hardware is cleaned, lubricated, and reinstalled.
- The drum and wheel are reassembled, torqued, and safety-checked.
Drum systems are more time-intensive and generally less effective under high thermal loads, which is why they’ve largely been phased out in favor of disk designs.
Replacing Brake Pads on Jets and Heavy Aircraft
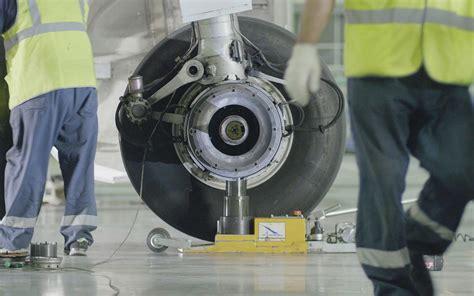
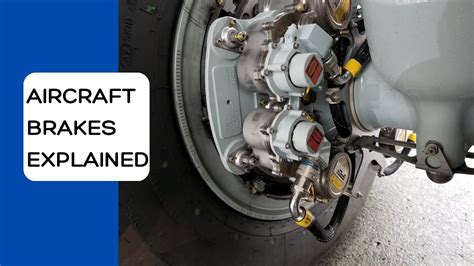
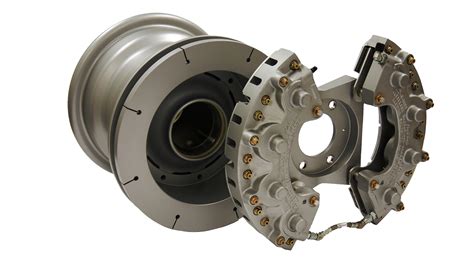
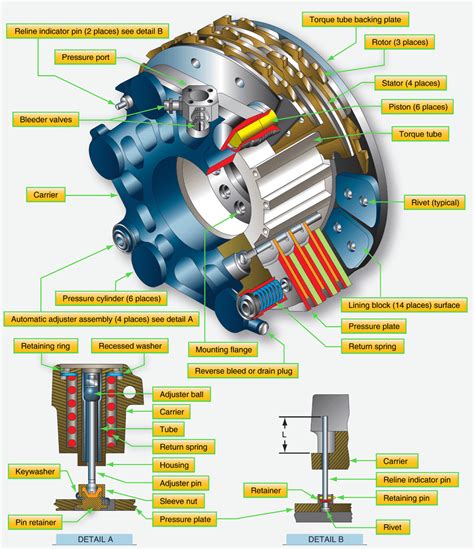
In high-performance aircraft such as business jets, regional airliners, and commercial aircraft like the Boeing 737, brake systems are significantly more complex. These use multi-disk carbon or steel brakes that are located within the wheel assembly itself. The replacement process is a multi-step operation that usually involves a maintenance crew and specialized tooling.
Steps typically include:
- Jacking the aircraft to offload the landing gear.
- Removing the wheel, often with the help of torque wrenches and hydraulic lifts.
- Extracting the internal brake assembly by disassembling the stack of rotors (disks) and stators (pads).
- Inspecting each component for wear, warping, or thermal damage.
- Replacing worn brake pads, which may involve unbolting or unclipping pad retainers.
- Reassembling the stack in the correct order with precise torque and alignment.
- Reinstalling the wheel, torquing bolts, and reconnecting hydraulic lines.
Carbon brakes, common in jet applications, offer excellent thermal performance and longevity. However, they require burn-in cycles or conditioning after installation. This involves conducting specific taxi procedures to gradually heat and cure the surface layer of the carbon pads.
Common Challenges and Pitfalls
Several issues can complicate brake pad replacement. For light aircraft, improperly torqued bolts or missing safety wire can lead to caliper movement or hydraulic leaks. In jet aircraft, misalignment during stack reassembly may cause rotor binding or uneven pad wear.
Technicians must also avoid contaminating the brake pads or rotors with grease or hydraulic fluid, which severely degrades braking performance. Precision, attention to detail, and adherence to Aircraft Maintenance Manuals (AMMs) are non-negotiable requirements.
Post-Replacement Functional Testing
Once replacement is complete, a functional test is mandatory. This includes:
- Pressurizing the hydraulic system and checking for leaks.
- Actuating the brakes multiple times to ensure smooth movement.
- Spinning the wheel (if off the ground) and applying brakes to verify pad contact.
- Confirming brake pedal travel and system pressure levels.
For larger aircraft, taxi tests may be conducted to ensure proper thermal response and braking efficiency. Maintenance records are then updated to document the parts replaced, date of service, and personnel involved.
When Should Aircraft Brake Pads Be Replaced?
Pad replacement intervals depend heavily on flight operations, runway types, and aircraft weight. Operators of light aircraft may go hundreds of hours between replacements, especially if landing on grass strips. Commercial jets may require pad replacement every few hundred landings, particularly at busy airports with short runways.
Visual indicators include:
- Pads worn to below serviceable thickness.
- Cracking or glazing on the pad surface.
- Rotor scoring or warping.
- Uneven pad contact or piston sticking.
Regular brake system inspections during 50-hour or 100-hour checks help preempt issues. Airlines often monitor brake wear indicators via digital sensors or manual gauges to predict replacement cycles accurately.
Conclusion: Expertise and Discipline in Aircraft Brake Maintenance
Replacing brake pads on an airplane is a vital task that ensures the aircraft can decelerate safely during landings and ground operations. Whether servicing a light piston aircraft or a high-speed jet, the process demands a deep understanding of the braking system, rigorous adherence to manufacturer specifications, and strict procedural discipline.
While the basic principle remains consistent—removing the worn pad and installing a new one—the complexity and technical demands increase exponentially with the aircraft’s size and operational envelope. Every bolt, safety wire, and torque specification has a purpose rooted in ensuring flight safety. There is no room for shortcuts or guesswork. Only through meticulous maintenance can we uphold the high safety standards that aviation demands.


")


