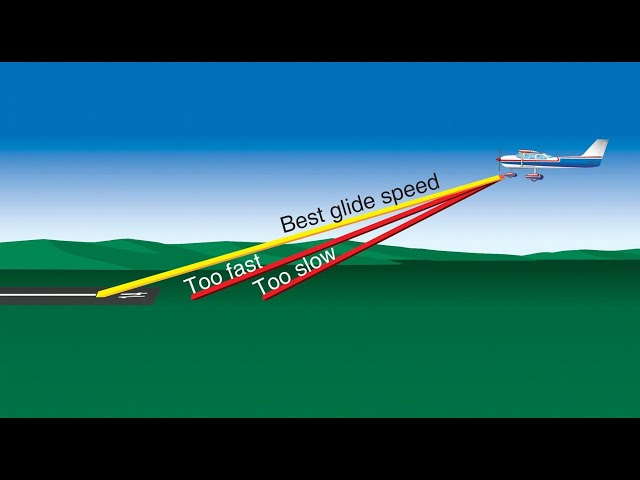
When a pilot encounters an engine-out situation, the immediate reflex is to optimize for best glide speed, ensuring the aircraft can cover the maximum distance with minimal altitude loss. But scenarios don’t always unfold that cleanly. Sometimes, a pilot finds themselves too high for a safe landing on a chosen field or runway. In such cases, understanding and applying the concept of best sink speed — or more accurately, maximum sink speed — becomes not just helpful, but essential.
What Is Best Sink Speed?
The term “best sink speed” refers to the velocity at which an aircraft loses altitude at the fastest possible rate, intentionally sacrificing glide distance in exchange for altitude loss. This is not a standard procedure taught in early flight training because it resides in the realm of advanced energy management, typically involving operation on the back side of the power curve. It’s an edge case skill — used not for escape, but for precision landing.
In most emergency scenarios, gliding far is ideal. However, if a pilot is too high to land safely, gliding efficiently becomes a liability. In this case, you want to descend rapidly while still maintaining control. That’s where the maximum sink rate — the opposite of best glide — comes into play.
Exploring the Back Side of the Power Curve
Every aircraft has a performance envelope. On the back side of the power curve, also known as region of reversed command, the aircraft requires more power to fly slower — a counterintuitive condition where adding power increases sink rate if mismanaged.
When we intentionally explore this region with idle thrust or no power, we enter a zone where drag is high, control responsiveness diminishes, and stall margins narrow. But this is also where we can maximize altitude loss over a short distance.
How to Increase Sink Rate Effectively
To execute a rapid descent while still aiming for a safe landing, a pilot must manipulate several controls:
- Pitch Control: Pulling the yoke or stick back — not just to maintain altitude, but to intentionally induce a stall or near-stall condition — increases the aircraft’s induced drag, creating more resistance against forward motion and increasing sink.
- Rudder Input: Heavy rudder input is used to manage yaw and prevent spin entry during a stall. Rudder can also be used to initiate slipping maneuvers that add more drag.
- Aileron Use in S-Turns: S-turns allow for controlled lateral movement, extending the aircraft’s path over the ground and giving it more time to descend vertically.
Together, these create a high-drag, high-sink configuration, enabling a pilot to shed unwanted altitude quickly without accelerating forward motion toward a runway that might otherwise be overshot.
Real-World Application: Field Too Close, Altitude Too High
Imagine this: you’re flying a light single-engine aircraft and lose engine power. You execute a standard procedure — trim for best glide speed, pick a field, and prepare for a dead-stick landing. But as you approach the chosen field, it becomes apparent: you’re too high. In this moment, best glide becomes irrelevant.
Instead, you shift your strategy:
- Induce drag: Pull the control column back to near stall, bleeding off energy.
- Slip the aircraft: Full rudder and opposite aileron to cross-control the airplane, adding profile drag.
- Extend the flight path: Use S-turns or a steep spiral over the field to spend altitude.
This isn’t guesswork — it’s precision. As you near the threshold and your energy is nearly depleted, you return to coordinated flight, lower the nose slightly, and flare just above the surface.
Misconceptions About Stall in Engine-Out Situations
There’s an enduring myth in some training environments that stalling during an engine-out approach is always fatal. In truth, intentional, controlled stalls above a safe altitude are powerful tools for increasing drag and controlling descent — provided the pilot remains within the margins of safety.
Controlled stalling in this context is less about achieving lift and more about dumping excess altitude in the most compact area possible. The goal is not to crash, but to manage energy so effectively that the aircraft becomes a falling stone you can still steer.
The Physics Behind Maximum Sink Rate
Maximum sink rate occurs where the power required curve meets its peak on the back side of the curve. This point corresponds to high angle of attack, increased drag, and low forward speed. Lift is still being generated, but barely, and the descent rate is near its maximum safe limit. The aircraft isn’t tumbling, but it’s far from cruising.
In technical terms, the maximum sink rate is reached at an angle of attack that creates enough lift to prevent a stall, yet produces significant induced drag. The aircraft is flying slowly, but vertically it’s moving downward aggressively. This tradeoff gives pilots a crucial lever when they need to shed altitude without gaining speed.
When to Use Best Sink Speed in Real Emergencies
Best sink speed is not a first response to engine failure. It’s a final approach tool, used when:
- The aircraft is too high and too close to the landing field.
- Normal glide would cause the aircraft to overshoot the landing zone.
- The pilot has confirmed no obstacles in the descent path.
- The airspeed and control margins are known and practiced.
It’s critical that this maneuver is rehearsed under supervision, preferably at altitude during training, and never attempted close to the ground by inexperienced hands.
Integrating Best Sink Speed Into Training
Flight schools and instructors should treat maximum sink maneuvers with the respect they deserve. They’re not reckless, but they are advanced. Proper training should include:
- High-altitude stalls and recovery.
- Full rudder slipping maneuvers.
- S-turns over landmarks to lose altitude.
- Visual estimation of energy remaining in flight.
The focus must remain on control, coordination, and judgment — not just on dramatic maneuvers.
Sink Rate vs. Glide Ratio: Know the Difference
Glide ratio is the distance-forward-to-altitude-lost metric — critical when trying to make a distant field. But sink rate is the rate of altitude loss per minute — vital when vertical precision is more important than distance.
High glide ratio = more distance covered with minimal descent.
High sink rate = less distance covered with rapid descent.
Understanding when to prioritize one over the other can mean the difference between a successful emergency landing and an uncontrolled arrival.
Final Thoughts: From Theory to Practical Survival
When flying, altitude is energy. But sometimes, you have too much of it in the wrong place. Mastering best sink speed gives a pilot the ability to shape their descent with surgical precision. It’s the antidote to overshooting and the safety net when best glide alone isn’t enough.
Incorporating maximum sink awareness into flight training empowers pilots to react with flexibility — not panic — when reality doesn’t match the textbook. For those who fly, it’s not just a tactic. It’s a last-mile survival tool.


: A Pilot’s Guide to Radar-Guided Landings")


