A precise landing begins with an accurate final approach — yet even the most seasoned pilots sometimes find themselves too high on final. Correcting this altitude error quickly and safely is crucial, and one of the most effective tools in a pilot’s skillset is the forward slip. This powerful maneuver enables steep descents without dramatic increases in airspeed, giving pilots a controlled way to bleed altitude and regain the intended glide path.
Understanding the Forward Slip: A High-Drag Descent Technique
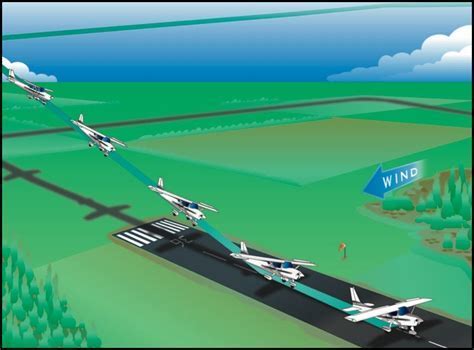
When an aircraft is high on final, deploying additional drag becomes essential. A forward slip accomplishes this by deliberately cross-controlling the airplane — banking in one direction while applying opposite rudder. This maneuver exposes the broadside of the fuselage to the relative wind, generating significantly more drag and increasing the descent rate. Unlike traditional steep descents that risk ballooning airspeed, the forward slip allows pilots to descend steeply while maintaining manageable speed.
To initiate a forward slip:
- Bring the power to idle.
- Ensure the aircraft is fully configured for landing, including full flaps (if permitted by the aircraft manufacturer).
- Apply aileron into the direction of the slip, typically the windward side in crosswind conditions.
- Apply opposite rudder to yaw the aircraft’s nose away from the bank direction. This keeps the aircraft aligned with the runway while presenting the side of the fuselage to the wind.
This cross-controlled state dramatically increases drag and initiates a rapid descent without compromising lateral tracking. The technique is effective, simple in principle, and indispensable in real-world landings.
Forward Slip vs. Sideslip: Know the Difference
Many student pilots confuse the forward slip with the sideslip used in crosswind landings. While both maneuvers start similarly, their objectives and execution diverge.
In a sideslip, the pilot banks into the wind and uses rudder to keep the nose aligned with the runway centerline. This counters crosswinds during touchdown, but the goal is to maintain the aircraft’s longitudinal alignment.
In a forward slip, however, the pilot deliberately misaligns the nose to present more surface area and increase drag. The aircraft will not track nose-first to the runway during this maneuver — the goal is steep descent, not alignment.
Managing Descent Rate Through Bank Angle and Rudder Input
The effectiveness of a forward slip hinges on how aggressively the aircraft is cross-controlled. The steeper the bank and the more rudder applied in the opposite direction, the greater the descent rate.
According to the FAA, bank angle is the primary variable that determines sink rate in a forward slip. A shallow bank may have minimal effect, but a pronounced bank — when paired with coordinated rudder — can yield descent rates that recover hundreds of feet in mere seconds.
However, there is a limit: the maneuver’s steepness is ultimately governed by rudder authority. If the rudder reaches its maximum travel and can no longer maintain the aircraft’s heading, the slip cannot be deepened further by banking alone.
In this case:
- Lowering the nose slightly can increase airspeed.
- This higher airspeed improves rudder effectiveness.
- Once additional rudder authority is gained, the pilot can safely increase bank for a steeper descent.
Be mindful that raising the nose has the opposite effect — decreasing both airspeed and rudder authority, which can inadvertently reduce slip effectiveness.
Recovering From a Forward Slip on Final Approach
Executing the maneuver is only half the equation — recovering smoothly and in time is just as critical. Slips should be exited well before touchdown unless absolutely necessary. Many pilots aim to recover by 300–500 feet AGL, but this depends on the aircraft, conditions, and the pilot’s familiarity.
To exit a forward slip:
- Gently level the wings.
- Simultaneously, relax rudder pressure.
- Adjust pitch attitude to resume a stabilized glide.
- Gradually add power back to normal final approach settings if needed.
Avoid the temptation to abruptly re-center the rudder — this can cause an uncontrolled yaw, spiking airspeed and unsettling the aircraft just before landing. A smooth transition from slip to stabilized flight is the hallmark of a well-executed approach correction.
Pitot-Static System Errors During Slips
An important yet often overlooked aspect of flying a forward slip is its effect on airspeed indicator accuracy. The FAA’s Airplane Flying Handbook notes that the location of pitot tubes and static ports can lead to erroneous readings when the aircraft is in a slip.
During a forward slip, the airframe’s angle to the relative wind changes dramatically, potentially misaligning airflow into the pitot-static system. This misalignment can produce inaccurate airspeed indications, which may under- or overstate actual speed.
As a result, pilots should rely not solely on instruments but also on:
- Aircraft attitude (visual reference to the nose position)
- Auditory cues (sound of airflow over the fuselage)
- Control feel (feedback from the yoke, rudder, and elevator)
These sensory inputs help ensure that the aircraft remains in a safe flight envelope, especially when visual references are clear.
When Not To Use A Forward Slip
While effective, the forward slip is not always the best solution. Some scenarios warrant a go-around instead of a high-energy correction:
- If the aircraft is excessively high on short final with insufficient distance to stabilize.
- When flying low-time or unfamiliar aircraft, especially those with unpredictable slip characteristics.
- In gusty wind conditions, where abrupt control inputs could destabilize the approach.
Ultimately, a go-around is never a failure — it is a sign of good decision-making. If there is any doubt about recovering the glide path safely and smoothly, it is better to power up, climb out, and try again.
Aircraft Limitations: Know Your POH
Before using forward slips in your aircraft, ensure that your Pilot’s Operating Handbook (POH) permits and outlines the maneuver. While most light aircraft, including trainers like the Cessna 172 and Piper Archer, allow slips with flaps, some models restrict slips when flaps are fully deployed due to potential stability or visibility issues.
Understanding the aircraft’s certified slip envelope, rudder limits, and recommended recovery altitudes is crucial. Remember that each airframe behaves differently — what works safely in one may not in another.

Mastering the Forward Slip: Practice, Not Just Theory
As with any maneuver, consistent practice under supervision is key to mastering the forward slip. Training with a certified instructor helps:
- Refine control coordination between rudder and aileron.
- Improve slip entry and recovery timing.
- Build confidence in judging descent rate vs. remaining runway.
We recommend practicing at altitude before attempting slips on final. Simulate the entry and exit of slips, vary the bank angle, and observe how different configurations affect descent rate and airspeed.
Even after proficiency is achieved, avoid complacency — maintain regular currency in slips to keep reaction times sharp and muscle memory intact.
Conclusion: Precision Tool for Precision Landings
A forward slip is not just a textbook maneuver — it is a vital real-world skill for managing altitude deviations on final approach. It allows pilots to quickly recover from high approaches without destabilizing the aircraft. When executed with finesse, it becomes a powerful tool in the pilot’s arsenal for safe, accurate landings.
We encourage pilots at all levels to integrate forward slips into their training syllabus, recognize when they’re appropriate, and execute them with confidence. Precision in aviation is not about perfection — it’s about having the tools to correct mistakes before they become problems.