Testing an electric motor is a crucial step in diagnosing faults and ensuring the efficiency of the motor. Whether you are working with an industrial motor or a smaller household appliance, knowing how to properly test an electric motor can save time, reduce costs, and prevent further damage to the system. In this article, we will walk through the detailed steps for testing an electric motor, addressing everything from basic checks to advanced diagnostic techniques.
Understanding Electric Motors: The Basics
Electric motors are complex machines that convert electrical energy into mechanical movement. They are found in countless devices, from household appliances to industrial machinery. When these motors stop working or underperform, it’s essential to diagnose the problem quickly and accurately. Testing an electric motor involves checking its electrical and mechanical components for potential issues.
Step 1: Inspecting the Motor for External Damage
Before diving into electrical testing, it’s important to perform a visual inspection. The first step in troubleshooting any electric motor should be to check for external signs of damage. Look for the following:
- Debris: Accumulated dirt, dust, or foreign objects inside the motor can cause overheating, prevent the motor from running smoothly, or lead to a complete failure.
- Overheating Signs: Darkened paint or scorch marks on the motor’s housing could indicate overheating. This is a common sign of a motor that has been running under excessive load or has suffered from faulty components.
- Broken Mounting: If the motor’s mounting holes or feet are broken or cracked, it can lead to misalignment and further mechanical damage. Always ensure that the motor is properly secured in its housing.
By identifying these visible issues early on, you can prevent the motor from experiencing more serious damage down the line.
Step 2: Verifying the Motor’s Grounding
Before conducting any electrical tests on the motor, it is essential to ensure that it is correctly grounded. Electrical motors, especially those running on high-voltage systems, can be extremely dangerous if not grounded properly. To check the grounding, follow these steps:
- Turn off the motor to avoid electrical shock.
- Set the multimeter to continuity mode, which is often the same as the resistance mode (Ω).
- Check for continuity: Place the negative lead of the multimeter on an unpainted metal part of the motor housing, ensuring good contact with the metal. Next, touch the positive lead to the battery terminals. If you get a reading other than infinite or overload, the motor is not grounded, and further handling should be avoided until a professional is contacted.
Step 3: Testing the Motor’s Voltage with a Multimeter
Once the motor is properly grounded, the next step is to test the voltage levels. The voltage test can help you identify electrical problems such as low voltage, short circuits, or a failed motor winding.
- Set the multimeter to the correct voltage setting: The motor’s voltage rating is typically found on the label. For an AC motor, use the AC voltage setting on the multimeter (denoted by a squiggly line). For a DC motor, use the DC voltage setting (denoted by a solid line with a dotted line beneath it).
- Measure the voltage: Turn off the motor, then measure across the motor terminals. Use the appropriate probes and set the multimeter to a voltage that matches or exceeds the motor’s rating. If the voltage is significantly lower than expected, it indicates a possible issue with the power supply.
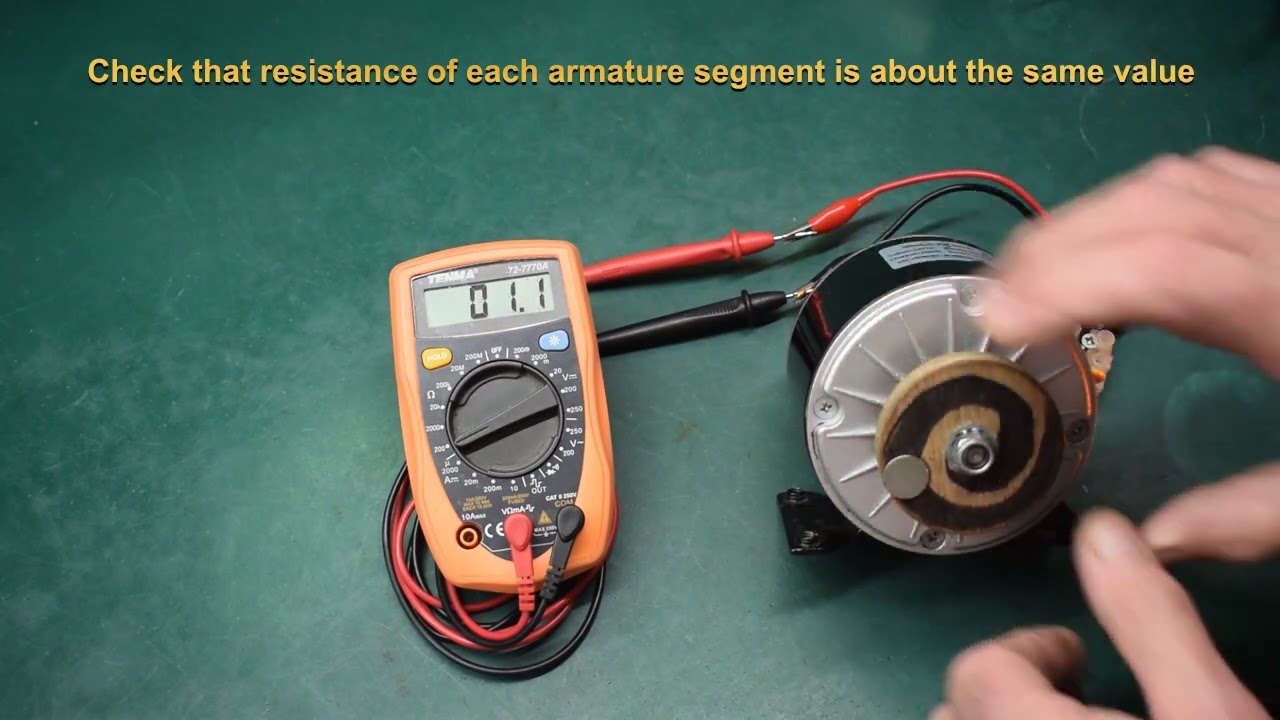
Step 4: Checking the Resistance of the Motor Windings
Testing the resistance of the motor’s windings can provide valuable insight into its health. A faulty winding is a common issue with electric motors and can cause them to underperform or stop working altogether.
- Set the multimeter to resistance mode (Ω). If the resistance is too high or low, this indicates an issue with the windings.
- Test the resistance between the motor’s leads: The motor should have low resistance, typically in the single-digit ohms range. If the resistance is higher than expected, it may point to a failure in the winding.
- Check for short circuits: A short circuit in the winding will prevent the motor from running correctly. This is usually identified by a reading of zero ohms, indicating a direct path between the leads.
- Inspect for open windings: If there is no continuity or the resistance is excessively high, the winding may be open or blown, rendering the motor non-functional.
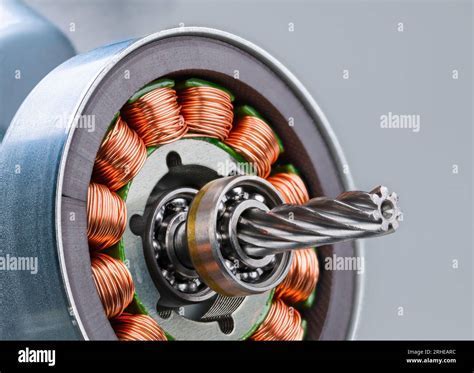
Step 5: Inspecting the Bearings and Shaft
One of the most common mechanical failures in electric motors is bearing failure. Bearings allow the rotor to spin smoothly within the motor housing. If the bearings become damaged or worn out, the motor may exhibit unusual noises, overheating, or fail to start altogether.
- Check for smooth movement: With the motor turned off, try spinning the rotor by hand. It should rotate smoothly and evenly. Any signs of resistance, grinding, or roughness suggest a problem with the bearings.
- Test for shaft displacement: Push and pull the shaft in and out to check for movement. A small amount of movement is acceptable, but excessive play can indicate worn-out bearings.
If the bearings are not functioning correctly, lubricate them or replace them as needed. Be sure to order the correct bearings for your motor’s specifications.
Step 6: Testing the Capacitor
Capacitors are critical components in motors, especially in AC motors. They store electrical energy and provide a boost to the motor during startup. A malfunctioning capacitor can cause the motor to fail to start or run erratically.
To test the capacitor, remove any protective covers and inspect for signs of damage such as bulging, leaking oil, or scorch marks. If the capacitor looks intact, use a multimeter to test its electrical properties:
- Set the multimeter to capacitance mode and connect the probes to the capacitor terminals.
- Monitor the readings: The resistance should start low and gradually increase. If it remains low or doesn’t change, the capacitor is likely faulty and needs replacing.
Step 7: Inspecting the Fan and Bell Housing
Some motors, especially Totally Enclosed Fan Cooled (TEFC) motors, rely on an internal fan for cooling. If the fan is obstructed or not functioning properly, the motor can overheat and eventually fail.
- Check the fan for damage: Inspect the fan blades for cracks, debris, or obstructions that could impair airflow.
- Test the bell housing: This part of the motor encloses the fan and rotor. Ensure it is free from damage and that the motor has adequate airflow to prevent overheating.
Step 8: Advanced Troubleshooting Tips
If the above steps do not pinpoint the problem, you may need to perform additional tests, such as:
- Testing the motor’s load: Use a tachometer to check the motor’s speed and ensure it is operating under normal load conditions.
- Examining the wiring: Inspect the internal wiring of the motor for any loose connections, frayed insulation, or burnt areas.
- Checking the centrifugal switch: Some motors use a centrifugal switch to engage or disengage certain windings during startup. Ensure the switch operates smoothly and is free from dirt or contamination.
By following these steps, you can thoroughly diagnose and troubleshoot issues with your electric motor.
Conclusion: Ensuring Long-Term Motor Performance
Regular testing and maintenance are essential to ensuring the longevity and optimal performance of your electric motor. By following the steps outlined in this article, you can diagnose most common issues and avoid costly repairs. If you encounter problems that require advanced expertise, do not hesitate to consult a professional technician.
By understanding how to test an electric motor thoroughly, you can save time and money while ensuring that your equipment runs efficiently for years to come.


